05/1/12

And suddenly our priority list changes…

A week or two ago, we had our first house-related emergency. Well, we’ve had the HVAC unit die twice, but both were fairly inexpensive fixes. This time, however, was not so cheap.

I believe I’ve mentioned before that our house has the original galvanized pipes. Galvanized pipes were common when this house was built in the 60s, but they are not the pipes of choice nowadays due to the fact that they break down. We knew fairly early on that we’d need to replumb the whole house someday. It was on our list, but not one of the priorities.

Shortly after a big rainstorm, I noticed there was a puddle in front of our house that hadn’t been there before. Since it had recently rained, I didn’t think much of it. Several days – perhaps even a week went by – before I realized that the puddle never went away. One Sunday, Paul crawled down to the crawlspace to take a look, and noticed it was particularly damp at the edge by the area of the puddle. My uncle (a handyman) came by and he and Paul dug around the area to find this:

A leak!

Yep, we were pretty sure our pipes were leaking! Specifically, the main water supply line that brings the water in from the street. We contacted a plumber who came out the next day and confirmed our diagnosis. He gave us a quote for a new pipe, and instructed us to contact Georgia 811 to mark the utilities before he dug.

Savannah supervises

It was all fairly painless, though we turned off the water for several days. We turned it back on in the evenings, but it was an interesting lesson in appreciating water! I never realized before how dirty my daughter got until I couldn’t wipe her mouth/face/hands/etc.

Our pipes are already deteriorating and we decided a long time ago not to drink the water. Here’s a sample of the water from our kitchen faucet after being gone for the weekend:
Our lovely tap water that we don't drink

Yeah, now you can see why we opt for bottled water!

04/9/12

having fun with the kitchen!

Yesterday, I was ready to wash my hands of this house and walk away and not look back. But today, I went to Home Depot and let myself dream and now I’m excited again.

We’ve decided that we’re going to take care of the foundation, then focus on the bathroom and kitchen. Honestly, with the amount of “extra” money we get, it will probably be years before we’re able to get to the foundation unless we make some serious lifestyle changes (which I’m not mentally willing to do right now, whether I should be or not). Sigh. But I will let myself dream of what this house could be if we could work on some of the little issues! Part of the problem is until we fix the foundation, we really shouldn’t touch anything else on the main level because that repair will surely shift things. (Example, some things on my “wish list”: replace all the baseboards, put up crown molding, get a new patio door with screen.)

Anyway, back to the kitchen. If you need a refresher about what our kitchen looks like, click on this post. (Oh and we also added a pantry.)

Some of the things I want to do:
– Replace all the cabinets. They don’t work with the current space, and we have trouble fitting our dishes in, in ways we never had trouble with any of the 4 apartments in which we lived.
– Replace the countertop. It does a really good job at hiding the imperfections, but it does need replaced.
– Put in a built-in dishwasher. I’m grateful to have a dishwasher, but I’m totally over the whole having to hook up hoses and losing the use of my sink every time I run a load. I also want a seamless counter over the dishwasher to the sink.
– Get a pantry. I do like the one we have, but I would also love a built-in one that would fit with the kitchen as a whole.
– Maximize cabinet and counter space. We only have one spot in our kitchen for meal prep – right next to the stove. I actually do a lot of prep on the dining room table. Overall, I really want to make sure our kitchen is most efficiently using all the space allotted!
– Replace the floor. That’s kinda an afterthought in my mind, but it makes the most sense to do it all at the same time. No idea what I want for the floor.

Some of the considerations:
– That darn HVAC vent just really messes up with our kitchen arrangement!! We’ll probably have to get a professional in here and get his opinion and a quote about moving it. In the doorway is probably the only spot. I do NOT want to lose all that valuable space where it is now!
– We have no plans to replace our fridge or stove, because the former we bought when we moved here and the latter still works great. We do want to think long-term about appliances when we buy the dishwasher, so we’ll probably decide on a color and we’ll need to make sure our fridge and stove are standard measurements.
– NO IDEA what to do about venting the stove. There is a really ugly fan thing on our ceiling that is original to the house and hasn’t been cleaned in that long, either – it’s really gross. I am not sure what’s recommended, or what works with our particular setup, or what.
– We’re totally willing to start from scratch and reconsider placement of appliances, but right now the pipes are already there for the sink and the gas line is there for the stove. Moving those would involve a professional and add to our total cost. Something to consider.
– Everyone wants us to tear down walls and open up the kitchen. It sounds great, but until I win the lottery I doubt it’s going to happen.
– Our neighborhood is lower middle class, and we’re going to keep that in mind as we redo the kitchen. We don’t want it to be “cheap” persay but we don’t want to get super nice things and not be able to recoup the money.

Today I took a look at Home Depot and the stock cabinetry they have. I am really drawn to the white cabinets, but am not settled on that. I took home the sheet of paper with the cabinet measurements, and proceeded to spend my afternoon measuring the entire kitchen. It was fun. :-) I very frustratingly realized that their pantry was about an inch too wide for me to fit everything I wanted to along the wall with the sink. So, I decided to check out Ikea.

I used Ikea’s kitchen planner and had a lot of fun. I am wary about my kitchen looking too “Ikea” so I am not sure we’ll do this, but it’s fun to daydream right now. They have a great pantry – not only is it more narrow, but it pulls out which I like. I’ve noticed it in the store before and I was impressed by the design. I think it would work great in our space.

Here are some screen captures from the Ikea kitchen planner. Here is the look when you first walk in. To the left there is the pantry, and then the dishwasher then the sink. In the corner would be a lazy Susan corner cabinet. On the wall is another cabinet with a space for a microwave. I wasn’t originally planning to put the microwave in the kitchen (it’s currently in the dining room), but the thought of it is nice! We will have to take the plug situation into consideration if we put the microwave there.

This would be the view from the other door. On the bottom left, there’s the corner cabinet, then a four-drawer cabinet, the stove, and a narrow cabinet on the right. Don’t mind the big green wall on the right – it’s actually another doorway; I just didn’t put it in. Along the top you have a one-door cabinet, a glass-door cabinet, and on the right another upper cabinet. Above the stove… that’s where I am not sure. We’ll have to ask the question.

And this is the other side of the kitchen. Fridge to the left, with cabinets above. (Which I added because I thought it looked better, but to be honest we never used the cabinets over the fridge in any of our apartments. So… I dunno.) Then this part is new: a lower and upper cabinet, adding another surface in our kitchen! Of course, this is assuming we move the #%$* HVAC vent. There is currently an outlet right there, so I think that would be a lovely place for my KitchenAid stand mixer, or any other small appliance. Don’t you think?

Ikea doesn’t have the greatest selection of countertops, so I just picked black. We’ll probably pick that once we for sure decide on the color of the cabinets. According to their planner, all of this would cost about $3200 (including a new dishwasher, and a new sink and faucet – two things we aren’t planning to replace but I put into the planner for visual purposes). So, that’s not too bad. We’ll have to revisit our budget in the future – once we’re at a point where we’re actually saving for this project!

03/24/12

Why yes, we do have a master bedroom!

You’ve probably noticed a shortage in pictures talking about our master bedroom. The truth is it’s the bedroom that is cleaned the least often and I’ve just not wanted to display that for the whole internet to see. :-) In fact, today when I finally tackled our room, I discovered screws and tools on the dresser from when we put together the furniture after moving in 2.5 years ago. Yeah….

So here is the only “before” picture I took:

Master bedroom

As you see, the bedroom was paneling painted white with red trim around the windows and doorway. There was also the lovely borderprint that matched the stuff in the living and dining room. The room was carpeted, and the inside of the closets were painted yellow.

Here’s an after shot, taken today (though 90% of the work we did was done in the first month of owning the house):
Our bedroom

Some of the things we did:
– Removed the borderprint.
– Painted the paneling a very light blueish color. It really doesn’t show up in pictures, but I love it in real life.
– Painted all the trim around windows & doors white, to match the rest of the house.
– Pulled up carpet to reveal gorgeous hardwood floors underneath. They’re in great shape because they’ve been covered by carpet for so long. We did get them refinished when we refinished all the floors before we moved in, but these didn’t need much to make them beautiful.
– Painted the inside of the closets white (as we did in all the other bedrooms). It makes SUCH a difference in my opinion.
– Installed a light switch because there wasn’t one.

From the same angle as the “before” picture.
Looking towards the closets - doors closed

Let’s face it, we never leave our closet doors closed. :-)
Looking towards the closets - doors open

Looking in the other direction…
Nightstand, door, dresser

Closet doors on the left, door to the hallway in the middle, and door to the bathroom on the right. We don’t use the door to the bathroom and keep it locked all the time.

Now that I’ve gotten all these pictures taken… I’m actually going to be selling our furniture pretty soon. It doesn’t fit well in our room, and we had to completely take the headboard & footboard off because it made the bed too long for the space. Here’s a picture of the headboard and footboard from a previous apartment – it matches the dresser and nightstand, which we bought all together. I’m still trying to figure out a good solution to our needs. The room is a bit difficult to arrange furniture because of the doors and HVAC vent on the floor. Also, while I LOVE the medium wood color of the current furniture, I’d like something that contrasts the floor a bit more. I haven’t decided anything yet… but these things are all what’s on my mind.

We also cut our grass in our backyard for the first time, and I’ll post pictures of that later! (It looks like an actual yard now!)

02/13/12

Finally! pictures of our backyard

Paul found the charger to the camera battery, and I was finally able to take pictures today!

We got the seed laid around the end of October. In retrospect, that wasn’t the best idea, because then all the leaves fell and we were unsure of how to rake them up without disturbing the new seeds. We were worried if we *didn’t* rake them, then it would hurt the ability of the seeds to grow. I did rake parts of the yard, and I have noticed now that the parts of the yard I didn’t rake look more sparse. If I remember correctly, with this type of grass we will need to reseed every spring – I need to investigate that more thoroughly though.

Newly graded and weed-free backyard! (for now)

You can see the areas where they graded the dirt.

Newly graded and weed-free backyard! (for now)

Then they seeded, and put straw down!

Hay for the backyard

Then came the task of watering. We watered the entire yard for 30 minutes a day every day for one week, then every other day for 2 or 3 weeks. Because we only had one spigot and one sprinkler, we had to do it in 4 segments to cover the whole yard. It took about 2 hours each time! I was glad when we were finished with that obligation.

Seeded & covered with straw

I took the following pictures today, about 3.5 months later.

New grass

My daughter LOVES running around in the backyard. Some of the grass is really long, and some is still short and looks like “baby” grass.

New grass

We planted grass behind the shed too, which helped clean up the area a bit. We slowly had to clean up that area the past 2.5 years – there was a LOT of junk and trash back there. You can still see a big pile of cinder blocks (from the old retaining wall) – we tried to stack them as neatly as possible, saving them for future use if we need them.

Behind the shed

I think we’ll mow it within the next month, getting it all the same length. Then we’ll be able to see the holes and if we need to reseed any particular area. I’ll have to do some research on the maintenance of this grass.

It’s really BRIGHT. It’s funny to look at it from the road because the grass in our side yard is faded and yellowish, and this grass is such a brilliant and vivid green color. Hopefully in the summer the colors will even up. I can’t wait to take official “after” pictures. :-)

02/1/12

Hello! and a quick update

I’m sorry for disappearing from this blog. A few things have been happening. First of all, sometime around Christmas my camera battery died. And when I went to look for the charger, I couldn’t find it. So, I have not been able to take any pictures of our new backyard. I need to either buy a new one or look harder… I’m excited to share our grass, which we had put in around the beginning of November!!

I also repainted a dresser for my daughters’s room, which turned out pretty awesome. I took all the “before” pictures but again, need the camera for the after pictures.

I want to change the name of this blog but I’m stumped for a good name. But once I do, I’d like to be pretty regular about posting here. You know, the project Tuesday I originally intended to do. We’ve lived here almost 2.5 years now and I still have yet to hang anything on the walls. I really should get on that!

With a new arrival expected this summer, I haven’t had any energy to do anything other than basic household chores. I am hoping that changes, because I really want to use this blog to keep myself motivated to provide a nice home for our family. Anyway, that’s what’s going on here.

10/22/11

Backyard – stage 2 this week

We had to do our yard in two stages, due to the grass only being able to be planted certain times of the year.

First stage was putting in a catch basin and underground pipes to divert the water to the back of our property. They also built a new retaining wall, which I love!! Now that it’s been almost 5 months, I can say that it has REALLY helped. It used to be with every rain, our yard would flood, but I haven’t seen it flood once this summer or fall. It’s amazing to be able to walk out back without our feet sinking in mud the day after a hard rain!

Stage 2 is grading the entire yard and planting new grass. Originally we were quoted the price for sod, but it was out of our budget so we’re going to have them put down seed. I am a little nervous about growing grass from seed, so if you have any advice please let me know! We’re planting fescue grass which apparently is the best for the shadiness of our yard. The landscaper told us we’ll have to reseed every year.

On Monday they are coming to put something on the ground to kill all the weeds. (I hope this also kills the poison ivy!) So, this weekend we are going to be cutting the weeds down as short as we can get them and also removing any debris from our yard. (Rusty paint cans, anyone?) Next Friday is when they’ll actually do the grading and plant the grass. So, next weekend look for some pictures. :-)

I just checked the water restrictions in our county, and it looks like the only restrictions non-vegetation things like washing cars, power washing, and kids water things. Ooops we totally didn’t follow that the few times we’ve power washed. It’s not fair that we can’t do any of that kind of stuff on Saturdays. :-( I’m pretty sure it would be incredibly dangerous for me to power wash something with a toddler running around, and my husband doesn’t get home until 8 or 9 most nights, so doing it then is out of the question. Grr. Good thing no one reported us. :-)

10/19/11

daydreaming about the bathroom

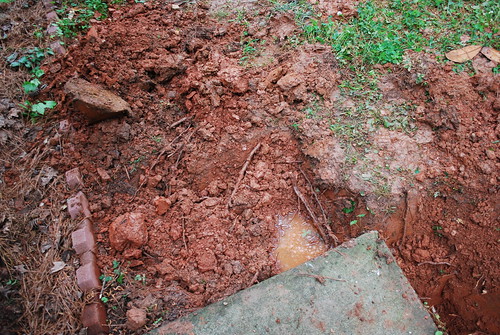
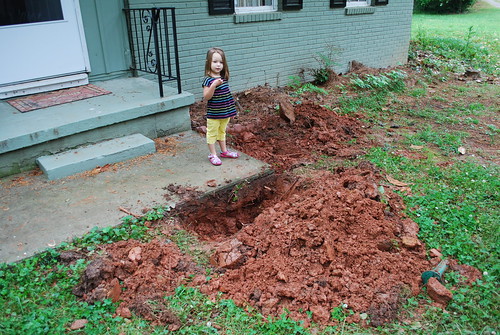
I spend a lot of time daydreaming about what I want to do with our house if I had unlimited funds. It gets me through the dry spell where we can’t really spend a lot of money redoing anything until we get our foundation fixed.

Barring an emergency, probably once we fix the foundation we’ll turn our sights to the bathroom and kitchen. The idea is that we’ll focus our efforts on things that are necessary to being able to sell the house. We don’t have plans to sell, but we want to not feel “stuck” if an opportunity came up. Also, with such a long to-do list, it helps us place priority on things. We’ll focus on the red flag items that came up during our home inspection, as well as taking care of smaller cosmetic details that will make a difference. For example, I want to put in all new baseboards throughout the house and perhaps crown molding as well. (Both of those things are waiting for the foundation repairs, of course.)

After the foundation, we’ll probably tackle the bathroom next since it will hopefully be a cheaper task than the kitchen. They say bathrooms and kitchens are very important when it comes to selling your house, which is why we’re putting them at a higher priority than other things. This might all change once we actually get there… I figure we’re still at LEAST 12-18 months away from the foundation (maybe longer), and then more time after that to save more money.

In the meantime, I’m daydreaming about what I want to do in the bathroom. I figure this is good for two reasons. One, it helps me get an idea of what I really want in there, and it will help us estimate our budget for the reno. As a bonus, it’s getting me through the boring stuff like foundation repairs!

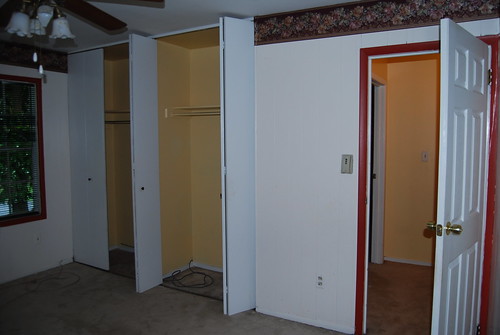
If you can’t remember what our bathroom looks like, you can get a quick refresher here.

First of all, we plan to take down all the weird faux tile on the wall and the mirrors. We’re not sure what’s behind them, so we’ll be prepared to perhaps install drywall if needed. We also want to close off the door that goes from the master bedroom into the bathroom. We never use the door and if you’re in the master bedroom, you can hear EVERYTHING going on in the bathroom (which is not very private in my opinion). Also, there is valuable space in front of the door in both rooms that can be used for something else. Hopefully it won’t be a problem to cover the doorway with drywall… We’ll have to consult some professionals when the time comes. I hope to paint the walls something like a sage green or a grayish blue… It’s hard to describe what I have in my head, but most likely paint color will be chosen after everything else.

I don’t think we can do anything about the layout of the bathroom without incurring great expense, and it’s fairly functional as it is given the space restrictions. I’d like to go dark color wood for the vanity and other accents. We have space for a 30″ wide vanity, and here is what I currently have my eyes on (I might change my mind later):

I love the dark wood color, and I would want the matching mirror as well:

And above the toilet, I plan to put in matching cabinetry for odds and ends and perhaps some linens:

Here is another cabinet option. This one isn’t part of the set like the other ones, but I like the style of it:

I’d have to see it in person to know if the colors match well enough.

Storage space in our bathroom is an issue, so I thought about getting some sort of linen cabinet like this one:

Perhaps putting it where the door currently is? I’d have to measure the space. We do have a linen closet, but it is in the hall outside of the bathroom. I’d love something in the bathroom as well, if it doesn’t make things too crowded. Another option is built-in shelves, which is another possibility. I definitely want to have plenty of towel rods (we don’t have any for bath towels currently).

For hardware, I am in love with brushed nickel. I like smooth and simple lines – nothing too ornate or too geometric. I’d try to match the faucets with the same metal for the light above the vanity:

We’ll probably replace the bathtub as well, as it’s stained from the shower doors we had for years. We also need to replace the tile around the tub. We haven’t decided yet if we’ll do a tub surround or if we’ll try to re-tile it. Tile would look nicer, but also be more work. If we go with tile, we will probably pick a sandy color that will match the vanity top. I would have to see samples to figure out what would look best with the dark wood of the vanity, but I love the idea of something very light but not white. It looks beautiful in my head – hopefully it looks that way in person too. ;-)

Three other things we want to do to the bathroom: first, we need more lighting (it is very dark in the shower area), so we thought two recessed lights above the shower would be awesome. Also, we need a bathroom fan to help prevent mold growth. The attic is right above the bathroom so hopefully neither of those two things will be complicated. Another thing which I’m VERY excited about is putting an outlet in the bathroom – probably by the sink. I don’t blow dry my hair or use a curling iron or anything, but I really miss having a way to put a night light in the bathroom.

So what do you think of our plans? They might change in the next 2 years… I may end up with a completely different color for the vanity and the hardware style/color… Or this may be just a first step. I’d love your feedback.

(All items found on Home Depot’s website)

10/18/11

Project Tuesdays and living room rug

I am going to try something new – we’ll see how long I am able to keep this up. I am going to try and update this blog every Tuesday with a house project that we did over the weekend. The purpose is twofold… one, it should keep this blog from getting too stagnant. Two, it should keep me doing things in the house. There are a lot of free or very inexpensive projects (as far as decorating, etc.) that I can do that will really help this house look better. I just tend to be very lazy!

This wasn’t something we did this weekend, but recently we did make a positive improvement to our living room: we got a new rug!

Here is a picture of our old rug:
Living room

When we moved into the house, we realized we needed something in the living room. Rugs are expensive, and to be honest I was not ready for that investment when I really had no clue about the decor of the room. So, we went to Home Depot where they were having a sale on 5×7 ft. rugs and picked out this blue one. I ended up really liking the color, but it was a little too small for the space. Also, I wanted something that was softer since we spend a lot of time on the floor. I decided to get something fairly neutral, matching our chocolate brown couches. We went to our nearby Rooms To Go Outlet and came home with this rug:

We got an 8×10 ft. which has helped somewhat keep our couches from sliding around everywhere. I looove the feel of this rug under my feet! We still need to figure out the perfect arrangement of our living room, but this is pretty functional for now.

New rug

New rug

I’ll have to use this rug to inspire me when I actually get around to decorating the house!

09/29/11

A full weekend of painting!

As I mentioned, my parents were visiting last weekend. We spent three days working painting the shed and the back of our house where the add-on sunroom was. It looks so much better! I’ll share the before and after pictures first since I know that’s what you’re really interested in. :-)

First off, the back of our house:
Where the porch was

This was what we discovered when we took off the sun porch. Apparently the house used to be yellow. I already touched up the paint around the front door, so this was just a continuation of that. It was a three step process – first, pressure washing the siding. Then we had to sand down all the remnant material from the add-on. My dad guessed it was very old Liquid Nails, or something similar. We used an electric sander to get it all as smooth as possible. Here is the after:

Back sliding glass door

Another angle, before:
New retaining wall

And after:
It looks so much better!

As you can see, the weeds have grown back from the work we had done in June! It looks great right now because my dad and Paul spent a lot of time weed whacking the backyard.

And now for the shed. I’ve been wanting to paint it because the bright yellow is so in-your-face. It also makes the shed look huge and overtaking the yard. Before:
Backyard

And after:
Such a change over the bright yellow!

Newly painted

We rented a pressure washer and Paul took care of the siding and the shed a few days before we wanted to paint.
Paul pressure washes the shed

Fortunately, Sherwin-Williams was having a great 40% off sale this weekend, so I took advantage. We started with a white primer, which was the only negative of the whole process. I didn’t notice until I got home that it was oil based, and in retrospect I wish I had immediately returned to the store and asked for an exchange. We ended up having to run out to Home Depot twice to get paint thinner to clean the brushes and the paint sprayer.

The primer is on!
(Sorry the picture isn’t great – at certain times of the day there’s nothing I can do about the direction of the sun!)

This was my first time using the paint sprayer. It made the job go a whole lot faster, though my arm was sooo sore from holding the heavy, vibrating machine. And yes, I did get a paint suit – I didn’t have any painting clothes that fit me, and I didn’t want to sacrifice another outfit. I loved my suit even if everyone teased me about it looking funny. It kept my arms and legs free of paint!
I did 90% of the painting on the shed

Using the paint sprayer

I did as much as I could without getting on the ladder, and then my dad did the rest. I dislike ladders so I was glad he was willing to do that for me.
Halfway done

Looking at it, I honestly think it needs another layer of green, so perhaps I’ll get to that someday. I also have a light to put up next to the sliding glass door as soon as I get the chance. :-) But overall, I think the shed and back of our house look great!

09/24/11

Big project this weekend!

We haven’t done much with our house this summer, aside from a few decorative things that I keep meaning to take a picture of so I can post about it. Mostly, our house is just incredibly messy and I keep saying that I need to just go through and do a major decluttering.

My parents are here this weekend and they love doing house projects. I appreciate the motivation, so I came up with a big project: painting the back of our house and our shed.

Where the porch was

Backyard

We are painting them the same color, the green that is the same as the rest of the house. I hope this will make the shed not feel so big and in-the-way! Today we rented a pressure washer and cleaned the shed and the siding, which has made quite a difference. I think I might keep an eye out for pressure washers on Craigslist because I could see it being quite a useful tool!

Tomorrow we are going to attempt to get as much of the junk off the siding as possible around our sliding glass door. As you can see from the picture above, there is a lot of stuff leftover from when the porch was put on the house. We guessed the porch was put on at LEAST 20 years ago (based on what the neighbors have told us), and more likely it was more like 30 years ago. They used something similar to Liquid Nails it appears, and even pressure washing didn’t make it budge. We talked to the guys at Home Depot and they recommended an old fashioned scraper and sand paper, at least to get it off enough to make the paint stick to it. That will be the project tomorrow, and Monday will be painting day. As you can see, it’s quite a big painting job so we’re going to rent a professional paint sprayer to make our day easier. I plan to paint the entire shed green, and the trim (the parts around the door that are currently brown) will be painted white to match the house.

I am excited! We need to call the landscaper and schedule their return to grade our yard and plant grass back there. That’s next on the agenda and will have to be done by November 15th I believe (before it gets too cold), but I need to look at our finances first and make sure that we’re still okay to move forward with this project.

Oh, in addition to pressure washing today, we also spent a lot of time in the yard. Paul weed-whacked, my dad raked, and I mowed. Our yard looks great! We still need to bag the leaves and pine straw, but already it is looking so much better. I would like to see the area under the magnolia tree cleaned up a bit, but other than that I’m really pleased with how it all is turning out.

Pictures to come!